Preparing Microsoft Entra for Autopilot Integration
Overview
Before enabling Windows Autopilot integration, Microsoft Entra and Microsoft Intune must be configured so that devices can be recognised by Autopilot and assigned the correct deployment profile.
This article explains the configuration steps required in Microsoft Entra and Intune.
How to Prepare Microsoft Entra for Autopilot
Step 1 — Create an App Registration
An App Registration allows the integration platform to communicate with Microsoft Graph.
- Open the Microsoft Entra Admin Center.
- Navigate to Applications → App registrations
- Select New registration.
- Enter a name for the application.
Example:
OneDeploy Autopilot Integration
-
Select Register.
Record the Application Information
After the application is created, record the following values:
These values will be required later when configuring the integration in the OneDeploy WebApp.
Directory (tenant) ID
Located on the App Registration Overview page.
Application (Client) ID
Located on the App Registration Overview page.

Step 2 — Create a Client Secret
A Client Secret is required for secure authentication to Microsoft Graph.
- Open the App Registration you created.
- Navigate to Certificates & secrets
- Select New client Secret.
- Enter a description.
- Choose an expiry period appropriate for your Organisation.
- Select Add.
Record the Client Secret
After the Secret is created, copy the Secret value.
⚠️ The Secret value is only displayed once upon creation. Store it securely as it will be required later when configuring the integration in the OneDeploy WebApp.
When configuring a Client Secret for an App Registration in Entra ID, note that secrets have a maximum lifetime (typically up to 24 months). Once the Secret expires, authentication will fail for any services using it, so you must create and update to a new Secret before expiry to avoid disruption. When your Client Secret expires, create a new one in Entra and update its value in the Secrets section of the OneDeploy WebApp.
Step 3 — Assign Microsoft Graph API Permissions
The App Registration must be granted permission to manage Autopilot devices.
- Open the App Registration.
- Navigate to API permissions
- Select Add a permission.
- Choose Microsoft Graph.
- Select Application permissions.
Add the following permission:
DeviceManagementServiceConfig.ReadWrite.All
This permission allows Autopilot device records to be created and managed.
Recommended Additional Permission
Device.Read.All
This allows device information to be read and can assist with monitoring device registration.
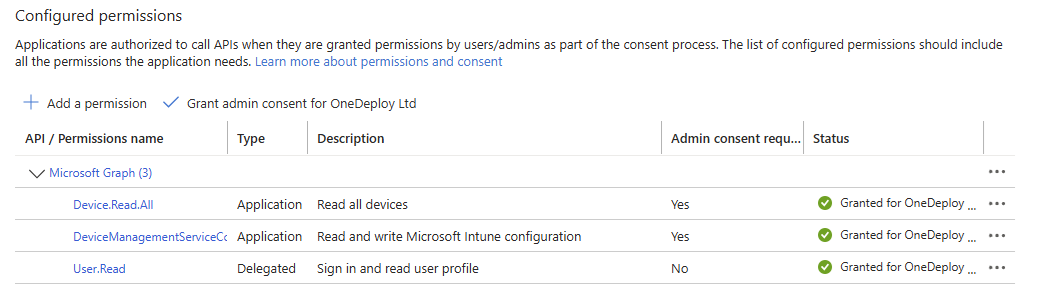
Step 4 — Grant Admin Consent
After adding the required permissions:
- Select Grant admin consent for [Your Organisation].
- Confirm the action.
This authorises the permissions for the tenant.
Step 5 — Create a Dynamic Device Group
Autopilot deployment profiles are typically assigned to device groups rather than individual devices.
Dynamic groups allow devices to automatically join a group based on attributes such as the Autopilot Group Tag.
- Open the Microsoft Entra Admin Center.
- Navigate to Groups
- Select New group.
- Choose a name for the group and set the following properties:
-
- Group type: Security
- Membership type: Dynamic Device

Record the ‘Object ID’ value for this group, as this will be required later on in the OneDeploy WebApp.
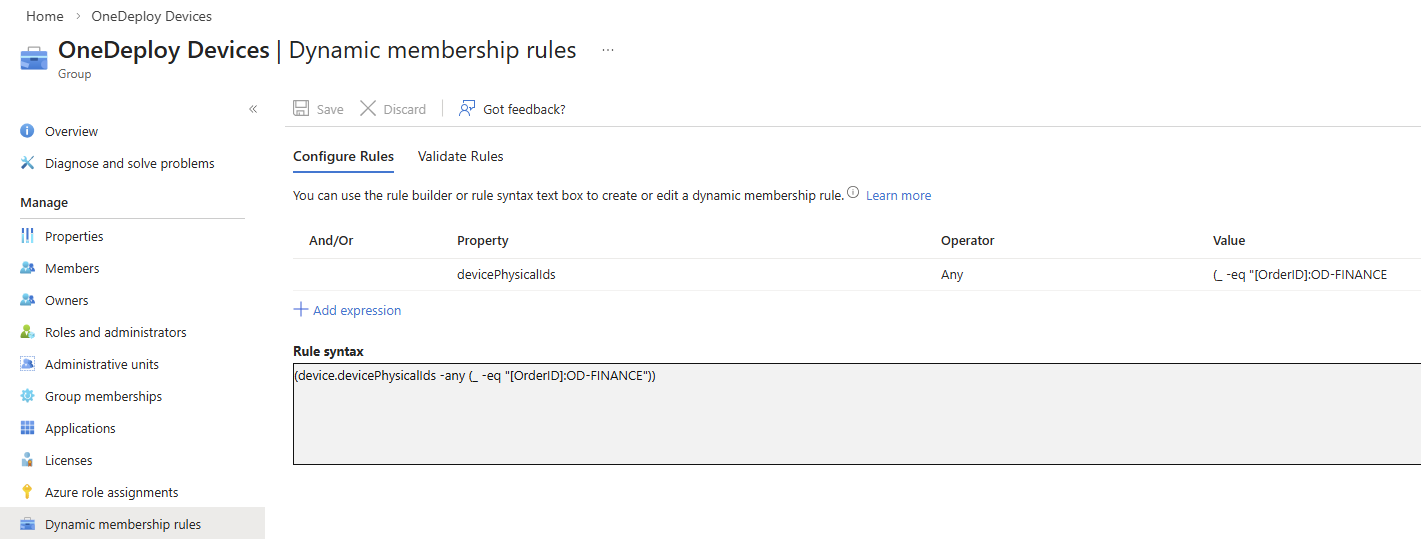
Step 6 — Configure the Dynamic Membership Rule
Create a Dynamic Membership rule for your group that matches the Autopilot Group Tag used for your devices.
Example rule:
(device.devicePhysicalIds -any (_ -eq “[OrderID]:OD-FINANCE”))
This rule ensures that devices registered with the example OD-FINANCE tag automatically join this group.
Record the Group Tag value, as it will be required when editing a build’s properties in the OneDeploy WebApp.
You can use any name you wish for the Group Tag (OD-FINANCE is just an example), as long as its name is entered consistently in the Dynamic Membership Rule and your OneDeploy build’s properties.
Step 7 — Assign an Autopilot Deployment Profile
Autopilot deployment profiles define how devices behave during the Windows Out-of-Box Experience (OOBE).
- Open the Microsoft Intune Admin Center.
- Navigate to Devices → Device Onboarding → Enrollment → Deployment Profiles
- Create a new Windows Autopilot Deployment Profile or edit an existing one.
- Configure the required options for your environment.
- Assign the deployment profile to the Dynamic Device Group created earlier.
Information Required Later by the OneDeploy WebApp
During the OneDeploy configuration process you will need several values from earlier in this article. Ensure you have the following items before moving on to the Windows Autopilot Integration – OneDeploy Steps article:
Directory (tenant) ID
Located on the App Registration Overview page.
Application (Client) ID
Located on the App Registration Overview page.
Client Secret
Created in the App Registration Certificates and Secrets page.
Group Tag Name
The name of the Group tag you selected when creating the Dynamic Membership Rule. This can be found in the Entra group’s Dynamic Membership Rules page.
Object ID of the Entra Group
This is listed in the Overview page of the Entra group as Object ID.
⚠️ The Client Secret value is only displayed by the Entra portal once when it is created, so ensure it is copied and stored securely.
Autopilot Self-Deploying vs User-Driven Modes
When configuring Autopilot, it’s important to choose the right deployment mode, as this directly affects both the enrolment experience and the intended use of the device.
-
User-Driven Mode is designed for individual users. During setup, the user is prompted to sign in with their work account, and the device is configured with both user- and device-targeted policies and apps. This is the standard experience for most employee laptops and desktops.
-
Self-Deploying Mode is fully automated and requires no user interaction. There is no sign-in during enrolment—devices provision themselves using a device-based identity. This mode is best suited for shared, kiosk, or frontline devices and only supports device-targeted configurations.
When to use each:
-
Use user-driven mode for personal, assigned devices where a specific user will sign in and use the device daily.
-
Use self-deploying mode for shared environments such as kiosks, meeting room PCs, retail devices, or any scenario where no single user is assigned.
Enrolment experience (at a glance):
-
In user-driven mode, the user connects to a network, signs in with their work account, and waits while apps and policies are applied before reaching their desktop.
-
In self-deploying mode, the device automatically provisions itself after connecting to the network, applies device-based configuration, and is ready for use without any user sign-in.
In practice:
- If you see a login prompt during setup, you’re using user-driven mode.
- If the device configures itself without any user input, it’s self-deploying mode.
You set the Autopilot deployment mode in Intune Admin Center \ Devices \ Enrollment \ Windows Autopilot deployment profiles