Getting Started Guide
This guide walks through the minimum steps required to perform a first deployment using OneDeploy.
It is intended to help you verify that your environment is correctly set up and to introduce the main components involved in a deployment, without going into detailed configuration for each area.
What This Guide Covers
In this guide, you will complete the following steps, which will allow the creation and deployment of your first OneDeploy build to a target device:
- Create your first Master Deployment Source file share and user account
- Log into the OneDeploy WebApp and run the Provisioning Wizard
- Add an Operating System to the library
- Set up a Local Security Model
- (Optional) Add a Software Package to the library
- (Optional) Add a Driver to the library
- Create your first Build
- Set up PXE or USB booting
- Perform your first deployment
Each of these steps is covered at a high level, with links to more detailed articles where appropriate.
What You Will Need
Before starting, ensure you have the following.
OneDeploy Access
-
A OneDeploy cloud login (provided by OneDeploy)
Technical Prerequisites
The following items are required and are described in more detail in the Technical Prerequisites document:
- A network with DHCP
- Internet access is optional but recommended
- A Master Deployment Source (file share), plus credentials
- A Management Computer
- This can be the same machine that hosts the Master Deployment Source
- The Windows ADK (with Windows PE add-on) must be installed
- The OneDeploy AdminUtils program
- Microsoft operating system installation files
-
A computer or virtual machine to use for your first deployment
Boot Requirements
- A TFTP server is required for PXE booting
- If PXE is not available, use a USB Boot device for the initial boot
Step 1: Creating your Master Deployment Source and User Account
OneDeploy requires a writable file share to store operating systems, drivers, software packages, and build data. This section describes how to create and validate a suitable Deployment Source.
Create the Folder to be used as the Master Deployment Source
Open File Explorer and create a new folder named C:\OneDeploy. You can specify an alternate location if required.
Create a Dedicated User Account
It is recommended to use a dedicated local or domain user account for OneDeploy access.
Local User (Example)
Using Computer Management or Settings, create a new local user, for example:
Ensure the account:
- Has a strong password
- Is not configured as read-only
- Does not have password expiry (recommended)
Set NTFS Permissions
The OneDeploy service account must have full read/write access to the Deployment Source. Read-only access will cause deployments to fail.
- Right-click C:\OneDeploy
- Select Properties → Security
- Click Edit
- Add the OneDeploy user account
- Grant Full control
Important: Do not restrict permissions to Read or Modify. OneDeploy must be able to fully manage files and folders within the Deployment Source.
Create the Network Share
- Right-click C:\OneDeploy
- Select Properties → Sharing
- Click Advanced Sharing
- Check Share this folder
- Set the share name to OneDeploy$
You can use an alternate share name if required, although in our examples we will use OneDeploy$.
Share Permissions
- Click Permissions
- Add the OneDeploy user account, or use a group OneDeploy is a member of
- Add any other groups/users that need access
- Grant Full Control
Share permissions must allow writes. Do not use Read-only shares.
Test Access (Strongly Recommended)
Before entering these details into OneDeploy, validate them manually.
Test by Mapping a Drive
From another machine:
Confirm that you can:
- Enter the correct password when prompted
- Create a folder
- Copy files into the share
- Delete files
If any of these fail, re-check:
- NTFS permissions
- Share permissions
- Username and password
- Firewall settings
Step 2: Log into OneDeploy and run the Provisioning Wizard


Step 3: Add an Operating System to the Library
We will now add our first operating system to the OneDeploy library.
When we create our first build later in this guide, it will be based on this OS.
Full details are covered in the documentation for Library → Operating Systems.
For this example, we will add the Windows 11 25H2 Feature Update, using an ISO file downloaded from Microsoft.
Add the Operating System
From your Management Computer:
- In the OneDeploy WebApp
- Navigate to Library → Operating Systems
- Click Add
- Select the Windows 11 ISO file when prompted

OneDeploy scans the media and displays the editions contained within it (for example: Pro, Enterprise, Education).

Click Next to import the operating system into the library.
Step 4: Set up a Local Security Model
OneDeploy uses Secrets to securely store sensitive values such as passwords.
To keep things simple, for our first build we will configure it to be a standalone machine with a local logon (as opposed to Autopilot/OOBE/Domain-join).
For your first build, we will create a Secret to hold the local Administrator password that will be applied to deployed machines.
This Secret will be referenced later when creating a Local Security Model for a Build.
Create the Local Administrator Password Secret
- Log in to the OneDeploy web interface
- Navigate to Definitions → Secrets
- You should see the secrets OneDeploy has already created for you during Provisioning for the Master Deployment Share username/password
- Click New
- Configure the Secret with the following values:
-
- Name:
My Local Administrator Password - Description: Local Administrator password for deployed devices
- Organisation: Leave this field empty
- Name:
Click Save and then click the Set Value button that appears.
Enter the password you want applied when systems are deployed and click Next to Save.

Choose a password that meets your Organisation’s security requirements. Once set, the value is stored securely and is not displayed again.

Note: If creating a new Secret, the ‘Set Value’ button only appears after the Secret is saved.
Create a Local Security Model
In this step, we will define a simple Local Security Model that our build can use to:
- Leave the built-in Administrator account enabled
- Set a predefined local administrator password
Local Security Models are documented in more detail in Config → Local Security Models.
Creating the Local Security Model
- In the OneDeploy WebApp, navigate to Config → Local Security Models
- Click New
- Configure the following options:
-
- Organisation: Select your Organisation
- Name:
Local administrator enabled and local password set
Configure the Administrator Account
- In the User Accounts tab, click New
- Configure the following options:
-
- Username:
Administrator - Password: Select the Secret created earlier for the local administrator password
- Password never expires: Enabled
- Display Name:
Administrator - Description:
Built-in account for administering the computer - Local Groups:
Administrators
- Username:
Note: If you are deploying non-English versions of Windows, adjust account and group names to match the local language.

- Click Save to add the account
- Click Save and Close to complete the Local Security Model

Step 5: Add a Software Package to the Library (Optional)
This step is optional.
You can add one or more applications to be installed during the build process.
Software Packages are documented in Library → Software Packages.
Step 6: Add a Driver to the Library (Optional)
This step is optional.
You can add one or more drivers to be offered for installation during a build on your hardware.
Drivers are documented in Library → Drivers.
In production environments, you would normally add drivers to supplement the built-in Windows Driver support for newer or Vendor-specific hardware. For onboarding purposes, drivers are optional — most hardware will function sufficiently using built-in Windows drivers for a test deployment.
Step 7: Create Your First Build
We will now create a very simple build for testing purposes.
Builds are documented in more detail in Deployment → Builds.
Create the Build
- In the OneDeploy WebApp, navigate to Deployment → Builds
- Click New
- Configure the following options:
-
- Organisation: Select your Organisation
- Name: Enter a name for the build (for example,
My first build)

Select the Operating System
- Open the Operating System tab
- Click New
- Select the operating system you imported earlier
- If multiple editions are available, select the required edition
- Click Save
In Default Product Key, enter a product key that is valid for the selected Windows version and edition.
For this example, we are using a generic KMS Client key for Windows 11 Pro:
W269N-WFGWX-YVC9B-4J6C9-T83GX
KMS client keys are published by Microsoft here:
https://learn.microsoft.com/en-us/windows-server/get-started/kms-client-activation-keys?tabs=windows1110ltsc%2Cwindows81%2Cserver2025%2Cversion1803
Assign the Local Security Model
- Go to the Domain and Accounts tab
- In the Local Accounts section, select the Local Security Model we created earlier:

On the General tab, uncheck the ‘Pre-Provision BitLocker’ option
Click Save and Close.
Before performing a deployment, the configuration stored in the OneDeploy cloud must be published to the Master Deployment Source.
In the OneDeploy WebApp, navigate to Config → My Tenant

- Click Publish Config
- When prompted, enter a description (for example,
Publish my first build) - Confirm the publish operation
During this process, all current configuration data (builds, operating systems, security models, and related settings) is written to the Master Deployment Source.
When publishing is complete, the following confirmation is shown:

Your first build is now ready to be used for deployment.
Step 8: Set up PXE or USB booting
You can use the USB creation tool to make a bootable USB Stick.
For PXE booting, you will need the following:
- DHCP Option 66 set to the IP address of your TFTP server
- DHCP Option 67 set to EFI\Boot\Bootx64.efi (for Intel/AMD Architecture machines) – change the filename to EFI\Boot\bootaa64.efi for ARM devices
- A TFTP Service installing on the computer listed in Option 66
- The TFTP-Root folder (aka Base Directory) set to C:\OneDeploy\Boot1\x64 (change this to C:\OneDeploy\Boot\1\arm64 for ARM devices)
With advanced DHCP servers, you can use DHCP Policies to set options such as automatic Architecture-specific DHCP 66/67 responses, but these are not discussed in this onboarding guide.
Here’s some example screenshots of a freeware TFTP server for our OneDeploy server’s network:

Our router is 192.168.2.1. DNS is set to Google’s DNS servers. Option 66 in Additional option points to the TFTP server, which in our example is 192.168.2.5

Base directory has been set to the default, C:\OneDeploy\Boot1\x64.
For TFTP, ensure ‘PXE Compatibility’ is unchecked. In case of issues, try unselecting the ‘Use anticipation window’ setting.
OneDeploy does not ship with a DHCP or TFTP server. It is expected that most networks will already have some form of DHCP. TFTP can be provided by several freeware and paid-for applications.
Step 9: Perform your first build deployment
Either PXE Boot or USB Boot the computer you wish to perform a build on. In this example, we are PXE booting:

Enter the Device Name when prompted. This will be the eventual Windows computer name.

Ensure the details look correct on the confirmation screen. Note that the next action will wipe the contents of the local hard disk. When satisfied with the selected options, click Deploy.
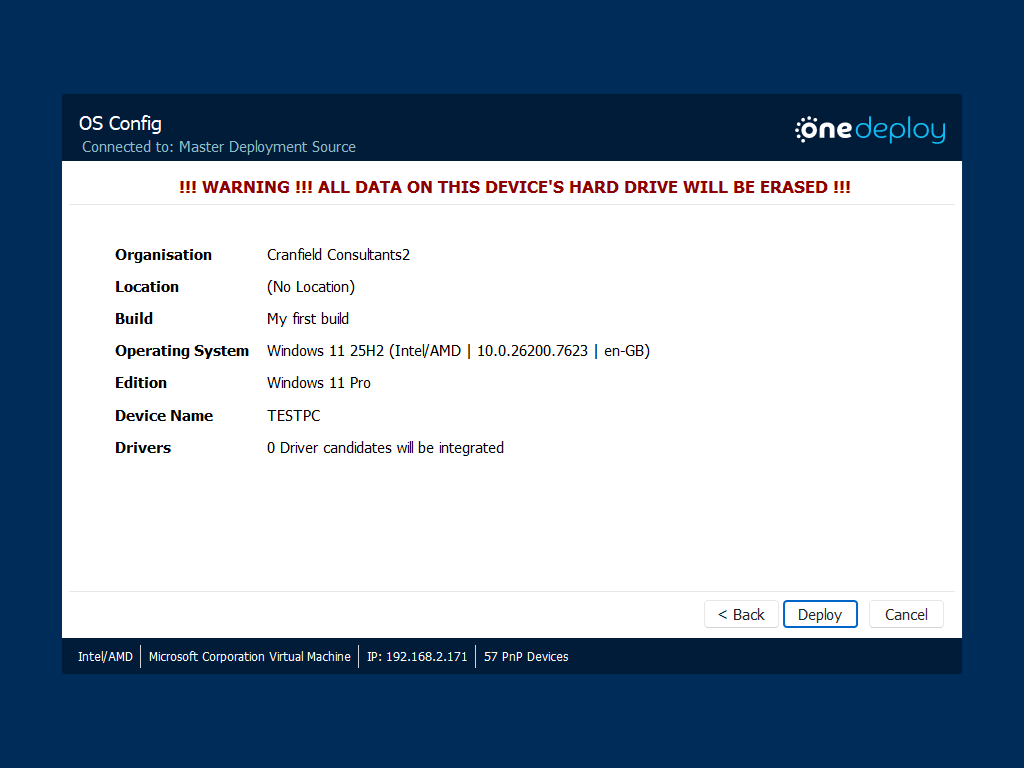
The OS is now deployed to your computer.

There will be a local user called Administrator with the password you specified back in the Secrets section.

That completes a very simple build. From here you can now do more complex tasks such as:
- Join a domain or use Autopilot
- Add OEM drivers for your hardware
- Add Software Packages to your builds
- Create new builds, or edit this test one
Common Questions
Do I need to complete every optional step to deploy a system?
No. Software Packages and Drivers are optional for an initial deployment. A basic build can be created using only an operating system and default settings.
Can the Deployment Source and Management Computer be the same system?
Yes. These roles can be combined on a single machine.
Is PXE required to get started?
No. If PXE is not available, you can use a USB Boot device for your first deployment.
Do I need internet access?
Internet access is optional at build deployment time. The computer hosting your Master Deployment Source does not need internet access.
You will need internet access on whatever PC(s) you have as Management Computers, where you use the OneDeploy WebApp cloud-based UI.
Related Articles
- What Is OneDeploy
- Concepts and Planning
- OneDeploy Components
- Technical Prerequisites