Overview
This article explains how to configure the operating system for a build in OneDeploy, including product keys, setup templates, disk partitioning, language and Architecture support.
When should I use this?
Use the Operating System tab when:
- Selecting which operating system a build will deploy
- Defining licensing behaviour using product keys
- Supporting multiple languages or processor architectures
- Updating a build to a newer Windows feature release
How to access the Operating System configuration
- In the navigation pane, expand Deployment.
- Click Builds.
- Select an existing build or click New to create one.
- Open the Operating System tab.
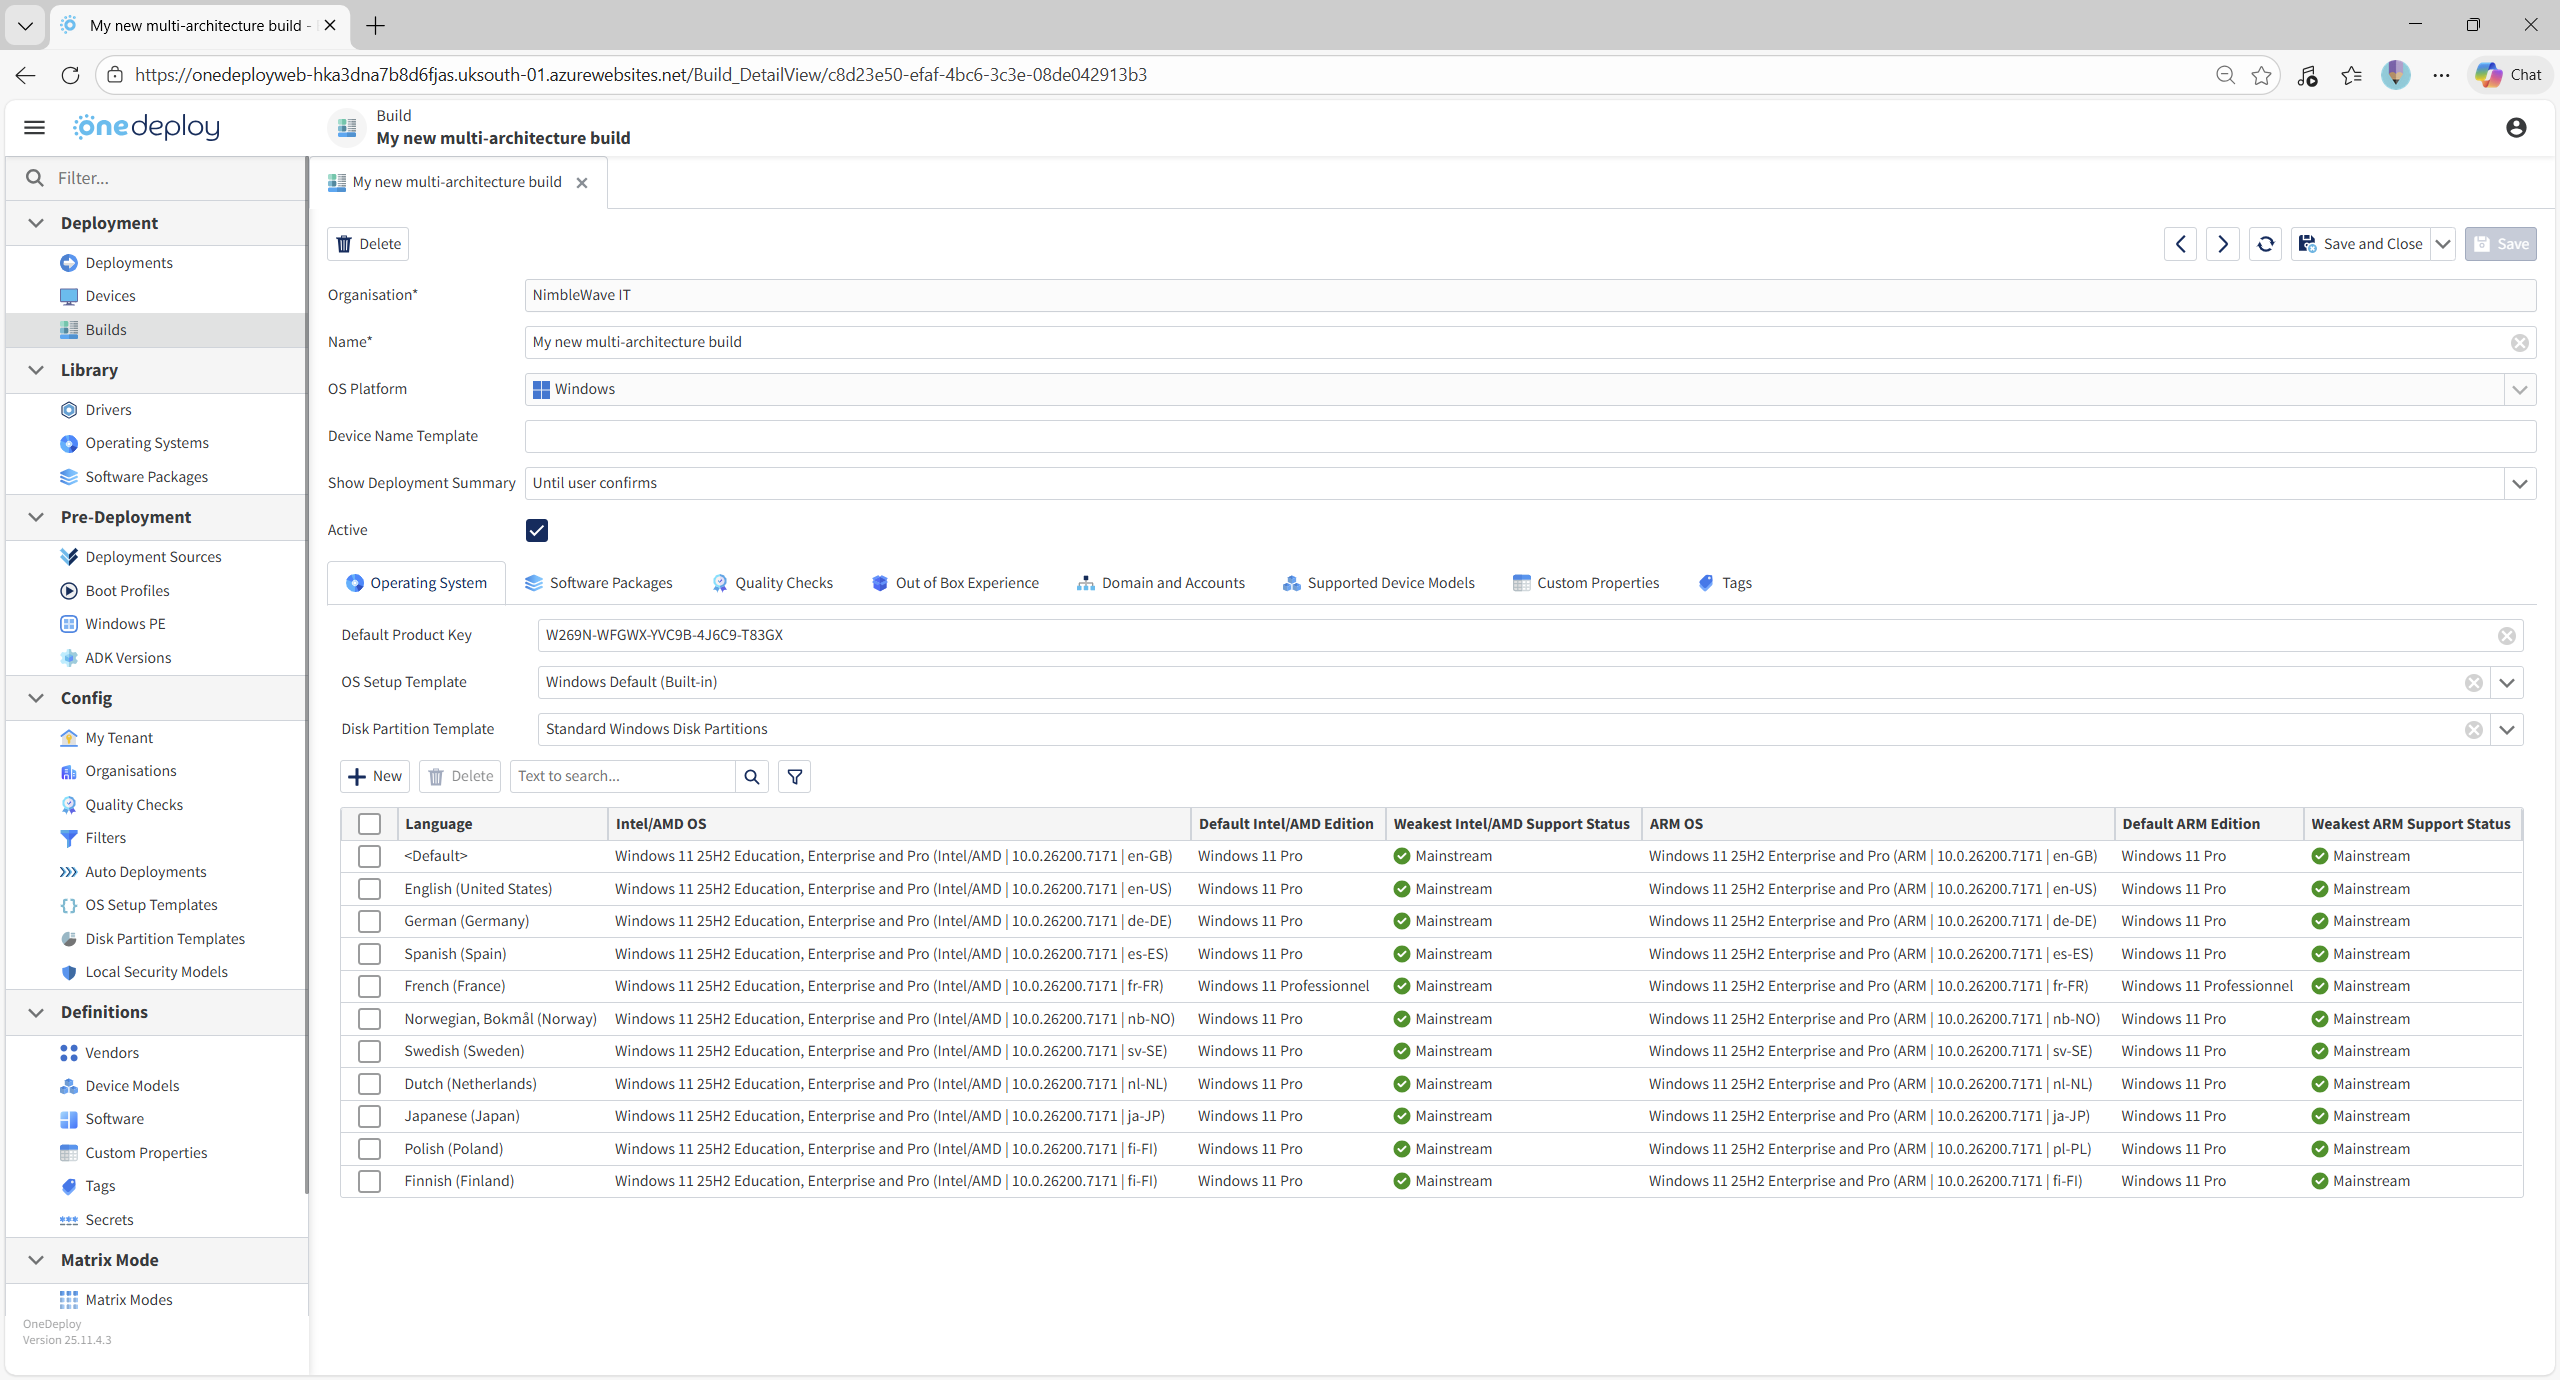
Default Product Key
The Default Product Key defines the Windows product key that will be used during operating system setup.
A valid product key should be entered for the operating system being deployed.
Entering no key or an invalid key may result in errors during Windows Setup.
Windows product key behaviour
Windows product keys influence:
- Which editions are available during setup
- Whether setup can complete successfully
- How licensing is applied after installation
Common scenarios include:
- Retail or Volume License keys for environments with central licensing
- Public KMS client keys, which can be used to complete Windows Setup even if activation will occur later
Using a KMS client key can be useful when:
- Licensing is provided by a digital entitlement in the device BIOS
- Activation is handled later by a KMS server or cloud-based licensing
Edition selection behaviour
The product key entered can affect which Windows editions are available.
For example:
-
Entering a Pro key may prevent Enterprise from being deployed, even if both editions exist in the OS source media.
When configuring builds that support multiple editions, carefully consider where product keys are applied.
Selecting operating systems for a build
A build must have at least one operating system defined.

Note that OneDeploy does not provide operating system media. All selections are made from operating systems that you have previously added under Library → Operating Systems.
The Operating System tab displays a table showing:
Adding or editing an operating system to a build
To configure operating systems for a build:
- Click New to add an operating system
- Click an existing entry to edit it
This opens the Build Operating System configuration screen.
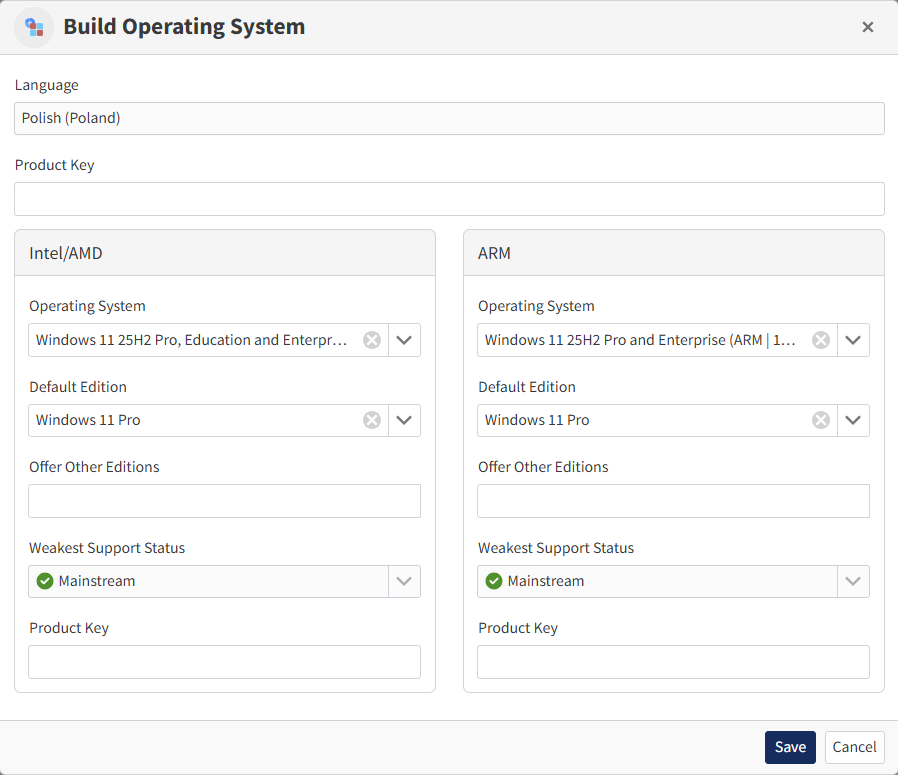
- Operating systems can be removed by selecting their entry in the summary view and clicking Delete.
Language selection
Language behaviour can be:
- Selected automatically
- Prompted for during deployment
This allows the same build to deploy different language versions based on location or user choice.
Edition selection
Windows editions (for example Pro, Enterprise, Education) can be:
- Fixed
- Prompted for during deployment
Product keys at OS level
Specific product keys can be entered:
- At the language level
- At the Architecture level
These keys override the Default Product Key when specified.
Support status visibility
OneDeploy displays the Weakest Support Status for each OS configuration.
This reflects the edition with the oldest end-of-support date, helping identify potential lifecycle risks.
Supporting multiple operating systems in one build
A single build can support multiple operating systems to enable branching behaviour.
Language-based branching
Different OS source media can be selected automatically based on:
- Location
- Requested language
For example:
- A site configured to request en-US will use the corresponding OS source media
- Additional languages must also be enabled in the build
Architecture-based branching
OneDeploy supports both:
This allows a single build to:
This is a key OneDeploy feature and avoids maintaining separate builds for different architectures.
What this means is you can have one build for both architectures across multiple languages, all installed from their respective Windows installation media automatically.
Changing the underlying operating system
The operating system used by a build can be changed without recreating the build.
For example:
- Switching from Windows 11 24H2 to Windows 11 25H2
- Using updated media from Microsoft that includes ‘baked-in’ monthly cumulative updates, eg: Replace Windows 11 25H2 RTM with Windows 11 25H2 with February 2026 cumulative updates pre-applied
When changed:
- All other build configuration remains intact
- Only the OS setup invoked during deployment changes
This makes it easier to:
- Keep builds aligned with Microsoft’s feature update cadence
- Avoid maintaining multiple image-based builds
Important considerations
- The newer OS version must already exist in Library → Operating Systems
- Thorough testing is strongly recommended before production use
You can also switch to refreshed ISO media for the same feature version, which may include cumulative updates. This means you can deploy computers that are more up to date than just the ‘once-a-year’ feature update 2xH2 releases. This isn’t a replacement for an ongoing patch management strategy, but it avoids deploying devices that could be up to a year out of date.
Even when you’re deploying the latest Feature Update version (eg: in September 2026, the original release of Windows 11 25H2 will still be the latest Feature Update version, but it will be running October 2025-level cumulative updates, making it 11 months out of date). Refreshing your installation media periodically can help mitigate this.
What happens next?
Once operating systems are configured:
- The build will automatically select the correct OS media at deployment time
- Language and Architecture branching occurs based on location and the hardware being deployed
- Future OS versions can be applied with minimal disruption
Common questions
Why do I need to add operating systems to the library first?
Builds can only reference OS media that exists in the OneDeploy library.
Can one build support both Intel/AMD and ARM devices?
Yes. One build can support both architectures using separate OS source media.
Does changing the OS affect other build settings?
No. Drivers, software packages, and other configuration remain unchanged.
I don’t have a product key — my device uses a digital license. What should I do?
If your device is licensed using a built-in digital entitlement (common on OEM systems), you do not need to enter a unique product key during deployment. Instead, use the appropriate generic KMS client setup key for your Windows edition. Windows will install successfully, then automatically detect and apply the existing digital license and attempt activation once internet connectivity is available.
Microsoft provides the generic keys here:
https://learn.microsoft.com/en-us/windows-server/get-started/kms-client-activation-keys
I have a Windows Pro digital license, but my Organisation has Enterprise/Education entitlement (for example Microsoft 365 E5). What should I do?
In most cases, you should deploy Windows Pro and allow Windows to automatically upgrade (“uplift”) to Enterprise or Education once the user signs in and the entitlement-based license is applied.
This upgrade does not require reinstalling Windows — it is an edition switch performed automatically by the operating system when it detects the higher-level subscription license.
If your Organisation uses volume licensing and you have Enterprise edition keys available, you can deploy Windows Enterprise directly instead.
Related articles
- Builds
- Operating Systems (Library)
- OS Setup Templates
- Disk Partition Templates