Library → Operating Systems
Every build requires an operating system, and at least one OS must be present in your library before any deployments can be performed.
This section explains how to add, manage, and control the operating system media available for use in your builds.
Overview
Before you can deploy devices with OneDeploy, you must add one or more operating systems to the OS library.
Operating systems in the library are used to:
- Create new builds
- Update existing builds to use newly added or refreshed OS media
- Control which editions, languages, and architectures are available for deployment
OneDeploy does not provide operating system media. You supply the installation files obtained from Microsoft or your OEM.
Supported operating systems
OneDeploy supports all modern Microsoft Windows platforms, including:
Client operating systems
-
Windows 10
- Semi-Annual Channel
- LTSB / LTSC
- Pro, Enterprise, Education, and related editions
-
Windows 11
- General Availability Channel (2xH2 releases)
- LTSC
- Pro, Enterprise, Education, and related editions
Server operating systems
-
Windows Server 2016, 2019, 2022, 2025
- Standard and Datacenter
- Server Core and Desktop Experience
-
Windows Hyper-V Server
-
2016 and 2019
-
Architecture and language support
- Windows 11 supports Intel/AMD (x64) and ARM (ARM64) installation media
- Multiple language versions of the same OS can be added
- A single build can:
- Automatically select the correct language based on build settings or deployment location, or
- Prompt for language selection at deployment time
OneDeploy will automatically auto-detect a device’s Architecture that a build deployment is running on, and select Intel/AMD (x64) and ARM (ARM64) installation media automatically.
Viewing the Operating System Library
Navigate to Library → Operating Systems to view your current OS library.
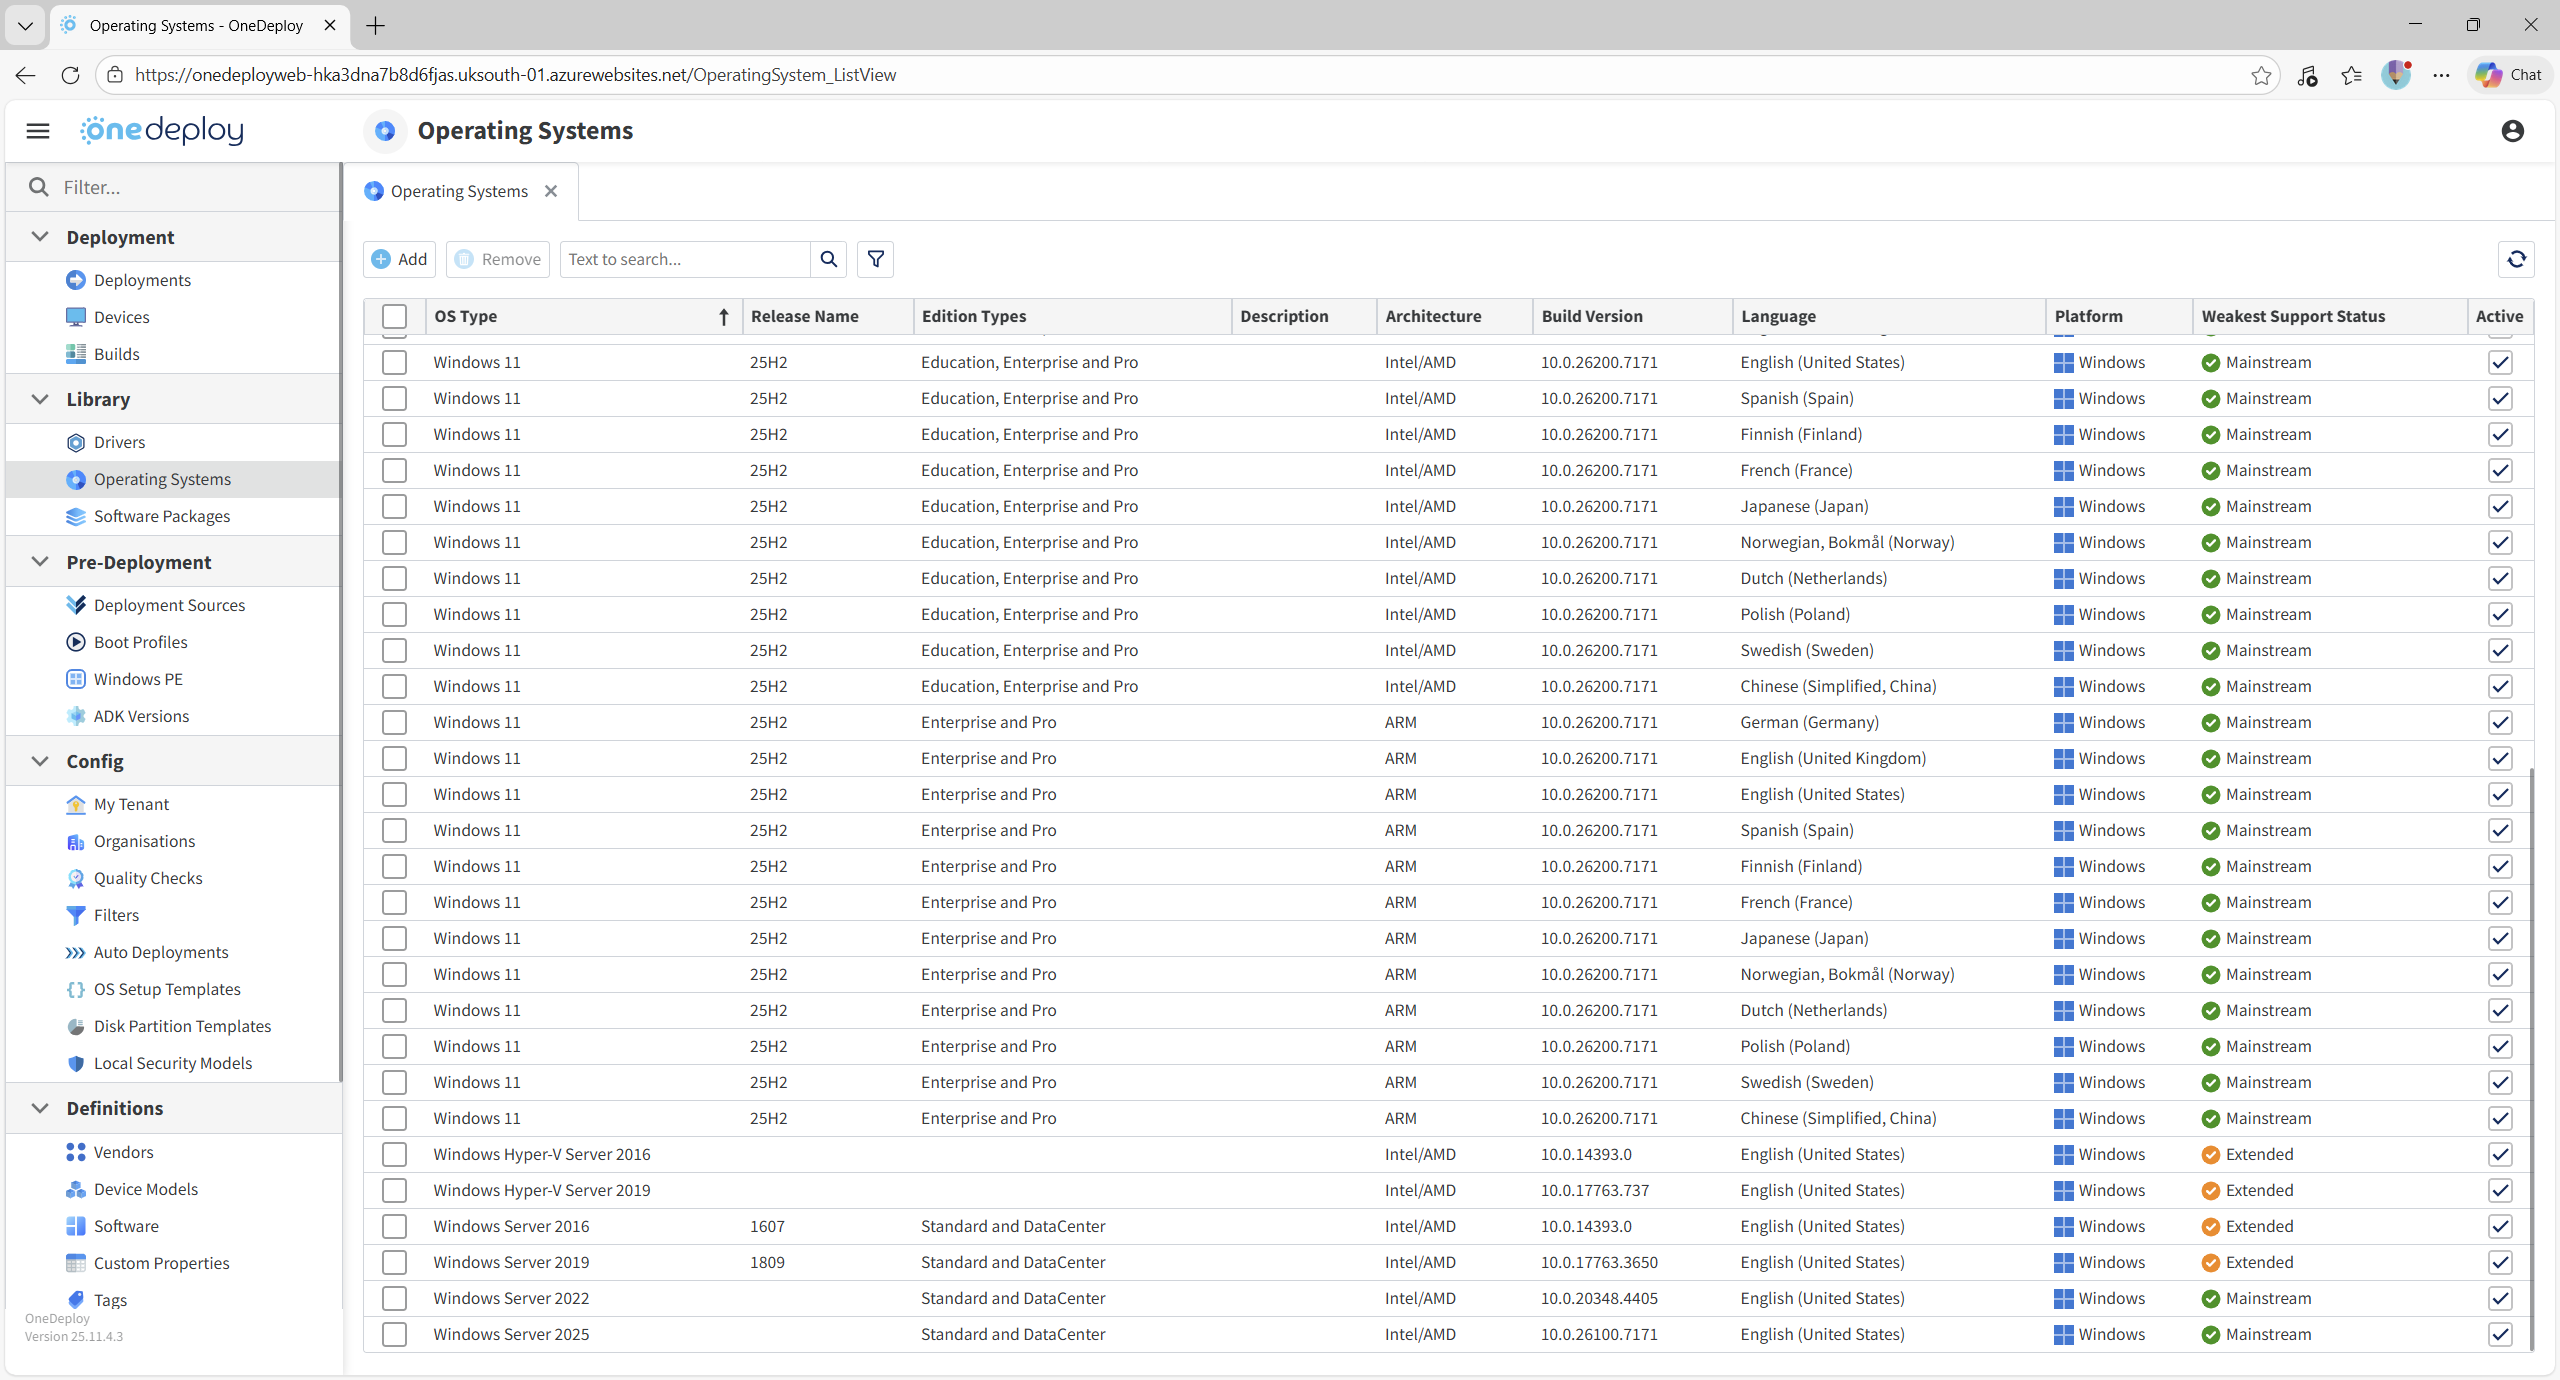
From this screen you can:
-
- View existing operating systems
- Add new operating system media
- Remove operating systems you no longer require
Adding a new operating system
To add a new operating system, click Add.
You will be prompted to specify the location of the Windows installation media.

Supported source types
You can add an OS using either:
- A folder containing Windows setup files
- An ISO file containing Windows setup files (typically downloaded from Microsoft)
Examples:
Adding an OS using extracted Windows setup files;

Adding an OS from an ISO file:
If an ISO file is selected, OneDeploy will automatically extract its contents for you. There is no need to extract or mount the ISO file manually.
Scanning and importing OS media
Once the source location is selected, OneDeploy scans the media and displays:
- Available editions
- Architecture (Intel/AMD or ARM)
- Bit level
- OS version details
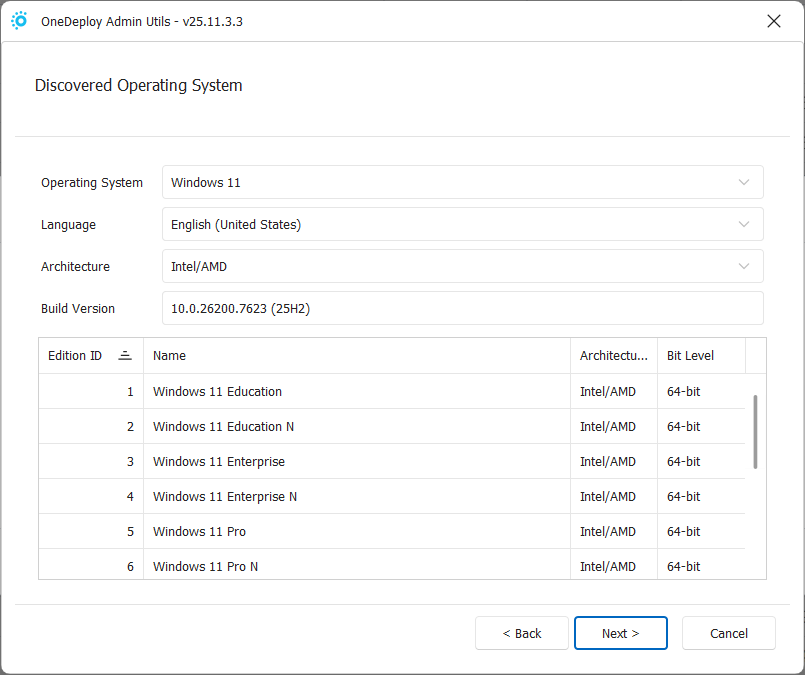
Click Next to begin importing the operating system into the library.
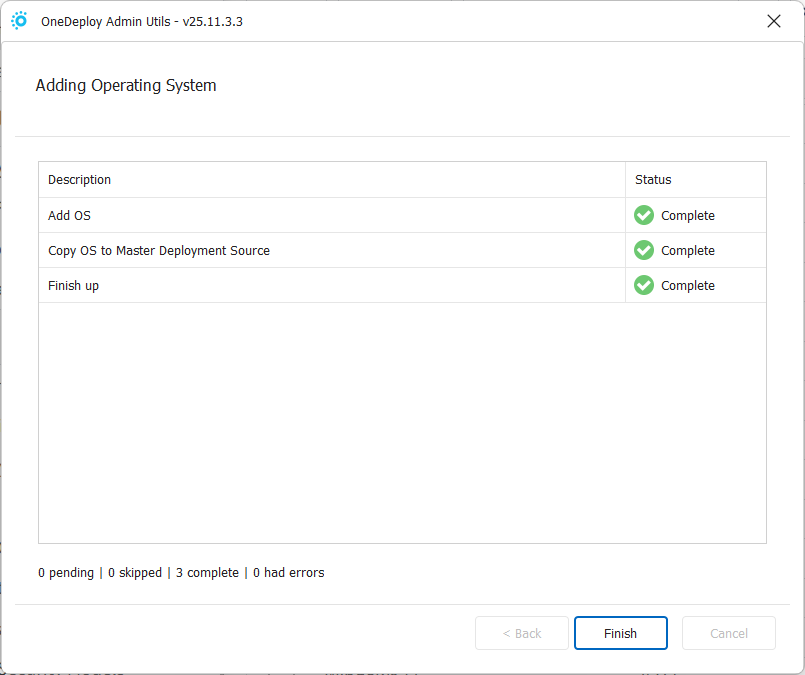
An import progress screen will be shown.

During the import:
-
- OS files are copied to your Deployment Source
- A reliable and fast connection between source and deployment storage is recommended
- Typical OS size is 5–8 GB
When complete, a confirmation screen is displayed.
Removing an operating system
To remove an operating system:
- Select its checkbox in the OS list
- Click Remove

Important – Ensure no builds rely on the operating system before removing it. Removing an OS that is still in use will prevent those builds from functioning correctly.
Viewing and editing OS properties
Click an operating system entry in the list to view its properties.
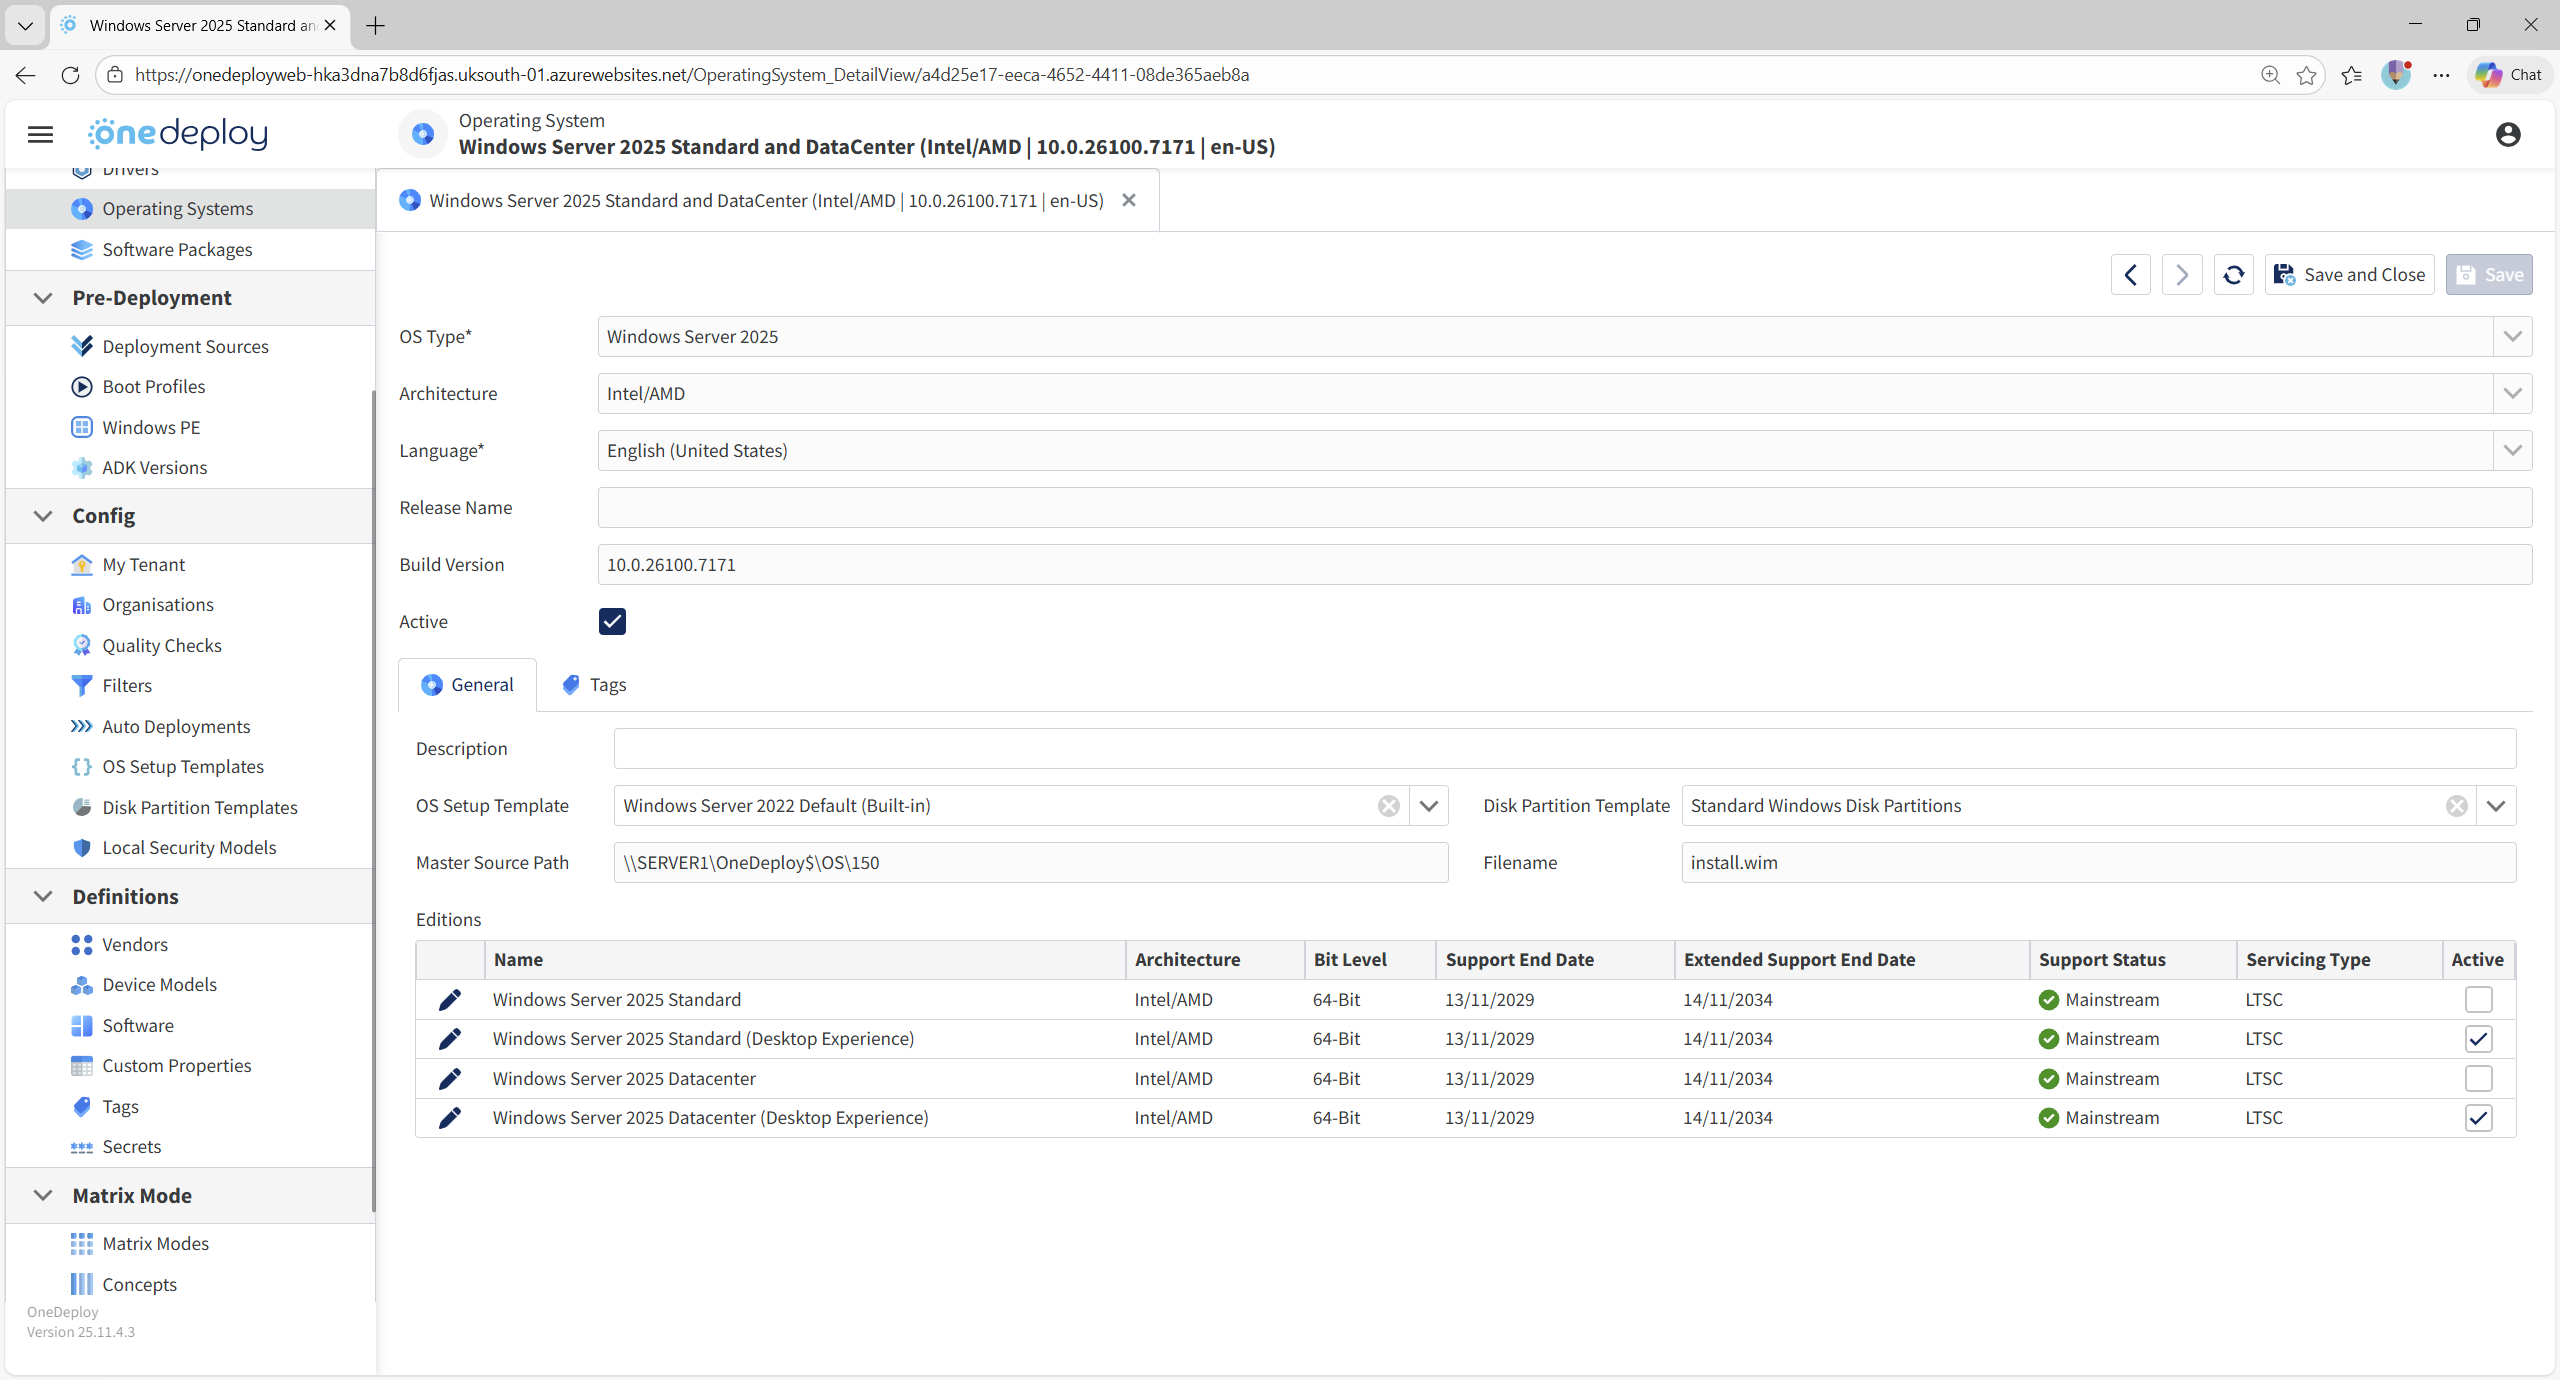
From here you can:
-
- Review OS details
- Mark the OS as Active / Inactive
- Add an optional description
- Define default OS Setup templates and Disk Partition Templates for new builds
- Control which editions are available for deployment
OS properties explained
Active / Inactive
- Unchecking Active hides the OS from build creation selection screens
- This is useful for temporarily retiring older media without deleting it
- Re-enable the OS at any time by re-checking Active
Description
An optional description that appears in the OS summary list.
Useful for noting update levels, source details, or internal naming conventions.
OS Setup Template
Defines the default OS Setup Template used when creating new builds from this OS.
- Built-in templates are suitable for most scenarios
- Custom templates can be created in Config → OS Setup Templates
- This default setting can be overridden per build
Disk Partition Template
Defines the default disk partition layout used for new builds based on this OS.
- Built-in templates suit most deployments
- Custom templates can be created in Config → Disk Partition Templates
- This default setting can also be overridden per build
Managing OS editions
Most Windows installation media (install.wim) contains multiple editions, for example:
-
- Windows 11 Home
- Windows 11 Pro
- Windows 11 Education
- Windows 11 Enterprise
- Windows Server Standard
- Windows Server Datacenter
- Desktop Experience and Server Core variants
All available editions are listed at the bottom of the OS details screen.
Marking editions Active / Inactive
To hide an edition:
-
- Click the pencil icon next to the edition
- Uncheck Active
- Save the change
Inactive editions will no longer appear in build configuration screens.

Example scenario shown:
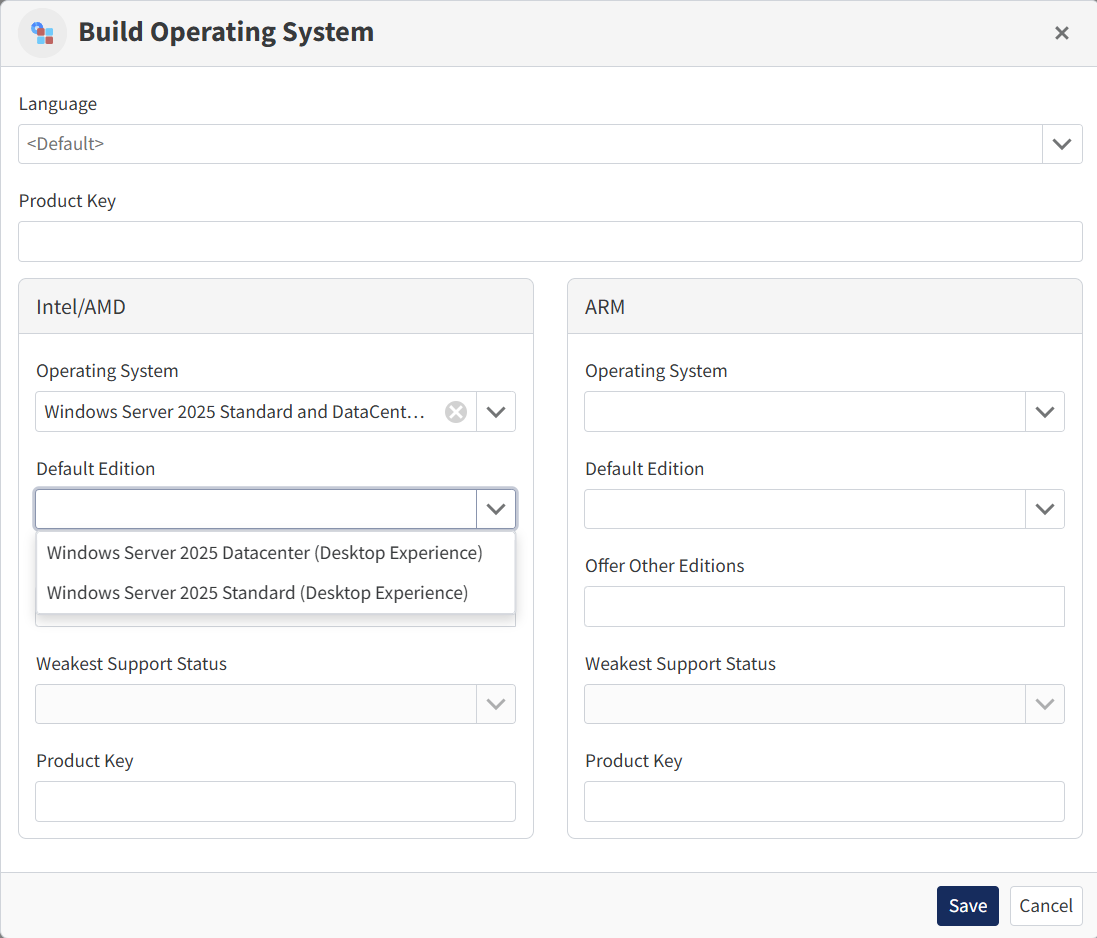
In this example, Server Core editions are hidden so that only Desktop Experience versions are available when creating builds.
When to hide OS editions
Hiding editions helps prevent accidental or unsupported build configurations. Common scenarios include:
-
- Hiding N editions of Windows that remove media functionality
- Hiding Server Core editions to avoid GUI-less installations (or vice versa)
- Hiding consumer editions such as Windows Home
- Restricting builds to a known, supported edition set
This approach keeps the build creation process simpler and reduces the risk of configuration errors.
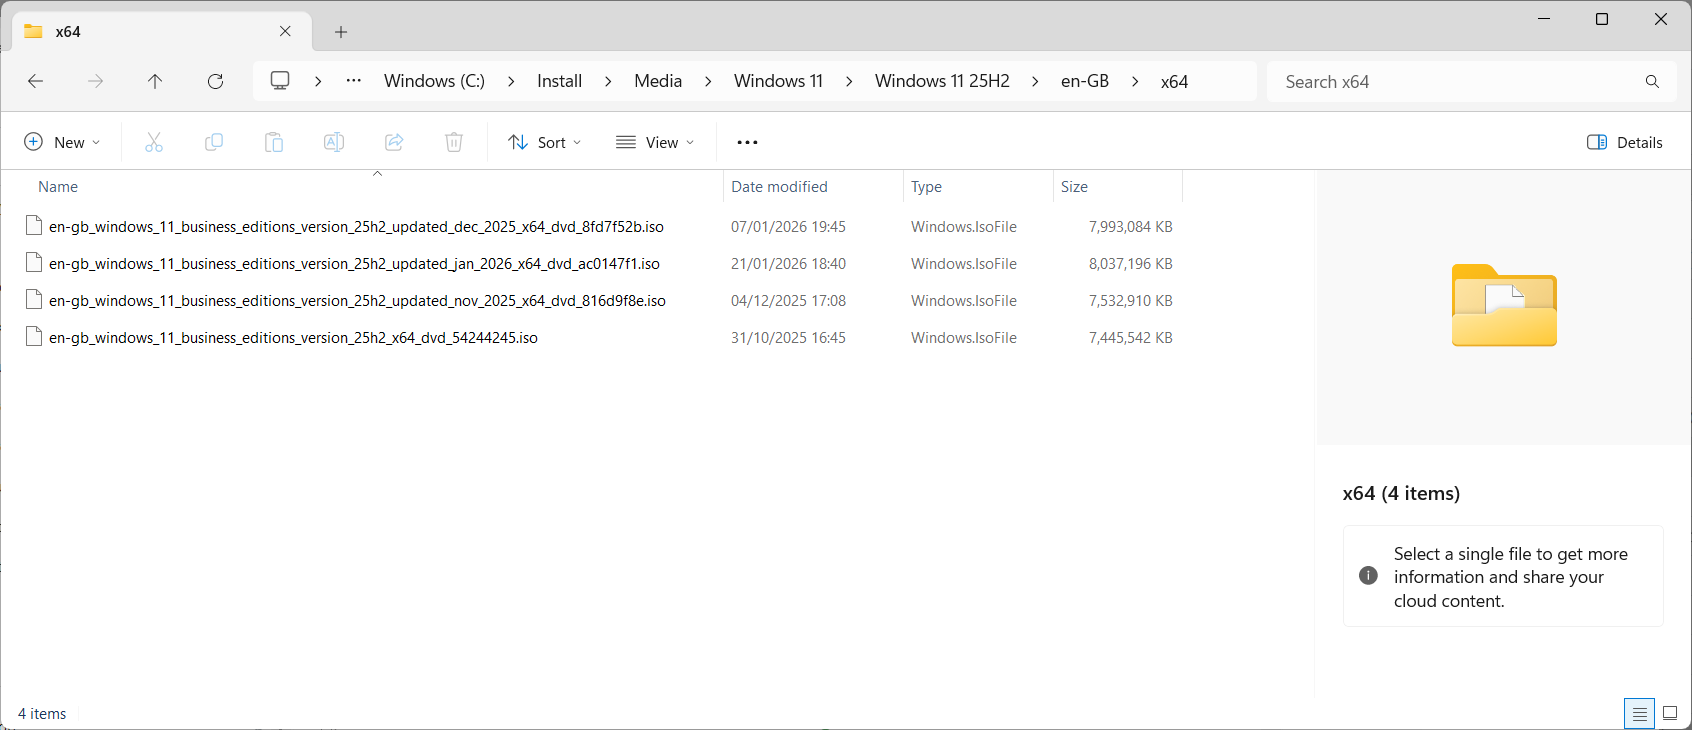
Using refreshed installation media
In addition to feature releases (for example, Windows 11 25H2), Microsoft regularly publishes refreshed ISO files that include cumulative updates rolled into the installation media.
Example:
Using refreshed media allows you to:
-
- Avoid deploying machines that are many months behind on updates
- Reduce post-build patching time
- Present a more professional, up-to-date deployment experience
- You can update existing builds to this new media in just a few seconds
This approach is not a replacement for ongoing patch management (such as Windows Update, Intune, or WSUS), but it does ensure that newly built devices are not already significantly out of date when delivered to users.
Handy hint:
You can identify similar or refreshed Windows installation media by comparing the Build Version number, which is visible in both the Library → Operating Systems summary screen (Build Version column) and the OS details page, which is shown when you select an OS from the summary page.
For example, Windows 11 25H2 (January 2026 refreshed media) reports a build version of 10.0.26200.7623, allowing you to quickly distinguish it from earlier 25H2 media that may share the same release name but include fewer cumulative updates.
Common questions
Can I change the OS used by an existing build?
Yes. Once new OS media is added to the library, existing builds can be updated to use it without recreating the build from scratch.
Does OneDeploy patch the OS after deployment?
No. OneDeploy installs the OS from the provided media. Ongoing patching should be handled by Windows Update, Intune, WSUS, or another management solution.
Can I support multiple languages or architectures in one build?
Yes. OneDeploy can automatically select the correct OS media based on location, Architecture, or deployment-time choices.
Does importing newer OS media replace existing operating systems automatically?
No. Each imported operating system is added as a separate entry. This allows you to control exactly when builds are moved to newer media and to retain older versions for testing or rollback scenarios.
Why do I see multiple entries for the same Windows version (for example, Windows 11 25H2)?
Windows installation media can exist in multiple variants, such as different languages, architectures (Intel/AMD vs ARM), or refreshed ISOs that include newer cumulative updates. Each variant is treated as a separate operating system in the OneDeploy library.
Related articles
- Builds
- Software Packages
- OS Setup Templates
- Disk Partition Templates